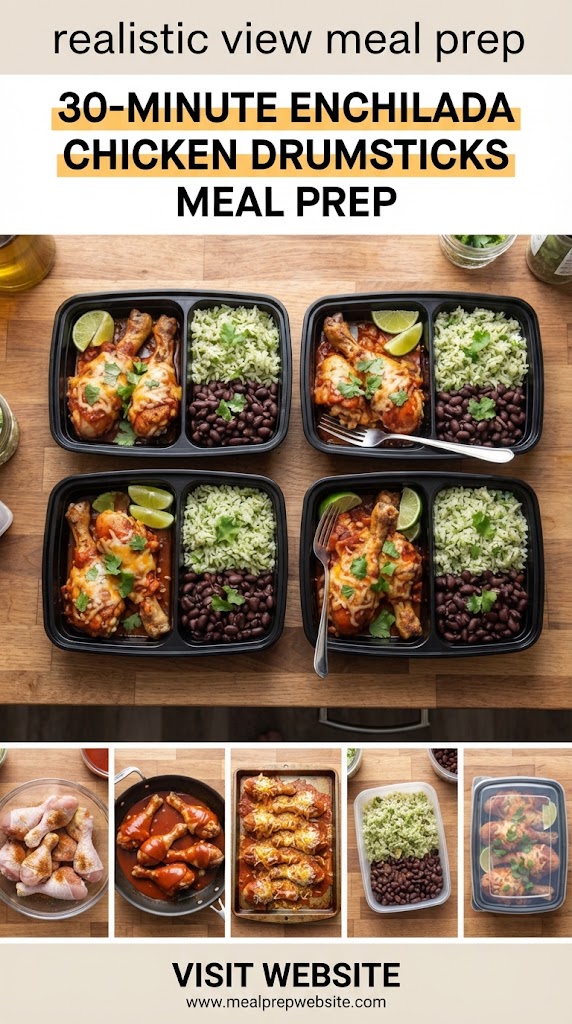
30-Minute Enchilada Chicken Drumsticks Meal Prep
In the fast-paced world of modern living, the “dinner dilemma” is a daily struggle. We want food that tastes like it spent hours simmering on a stove, but we only have thirty minutes between getting home and hitting the gym or settling into evening chores. Enter the 30-Minute Enchilada Chicken Drumsticks—a recipe designed to bridge the gap between gourmet flavor and practical efficiency.
Chicken drumsticks are often the unsung heroes of the poultry world. They are incredibly affordable, naturally juicy thanks to their higher fat content compared to breasts, and they hold up remarkably well during reheating, making them the gold standard for meal prepping. When you marry the succulent texture of dark meat with the bold, smoky, and slightly spicy notes of traditional enchilada sauce, you create a meal that isn’t just fuel—it’s a highlight of your day.
This guide will walk you through every nuance of mastering this dish, from the science of the 30-minute window to the best storage practices to ensure your Friday lunch tastes just as vibrant as your Monday dinner.
Why Drumsticks are the Superior Choice for Meal Prepping
When most people think of meal prep, they immediately gravitate toward boneless, skinless chicken breasts. However, experienced “preppers” know that chicken breasts have a fatal flaw: they dry out. By the time Wednesday rolls around, a microwaved chicken breast can have the texture of a pencil eraser.
The Moisture Factor
Drumsticks are dark meat. This means they contain more myoglobin and connective tissue than white meat. As these tissues break down during the cooking process—even a rapid 30-minute one—they release moisture and gelatin, ensuring the meat remains tender. When you reheat drumsticks in a microwave, that internal moisture helps steam the meat from the inside out, preserving the “just-cooked” quality.
Cost-Effectiveness
If you are looking to optimize your grocery budget, drumsticks are a clear winner. They are frequently one of the most affordable cuts of meat in the USA. By mastering the drumstick, you can lower your cost-per-meal significantly, allowing you to splurge on high-quality organic vegetables or premium enchilada sauces.
Portion Control
Drumsticks come with a built-in portion control mechanism: the bone. It is easier to visualize your protein intake when counting drumsticks (e.g., 2 per meal) than it is trying to eyeball the weight of a sliced chicken breast.
The 30-Minute Mastery: How to Hack the Clock
The biggest hurdle with bone-in chicken is the cooking time. Traditionally, drumsticks can take 45 to 50 minutes in a standard oven. To get this down to 30 minutes without sacrificing safety or flavor, we use three specific techniques:
- The High-Heat Roast: By cranking the oven to 425°F (220°C), we force the heat to penetrate the bone faster while crisping the skin.
- The “Scoring” Method: By making shallow slits in the thickest part of the drumstick, we increase the surface area. This allows heat to reach the center faster and lets the enchilada sauce permeate deep into the meat.
- The Room Temp Start: Taking the chicken out of the fridge 10 minutes before cooking (while the oven preheats) takes the “chill” off, reducing the time it takes for the internal temperature to rise.
Ingredients: The Anatomy of Flavor
To achieve a complex flavor profile in a short amount of time, we rely on a combination of pantry staples and fresh accents.
The Protein
- 2.5 to 3 lbs Chicken Drumsticks: Look for skin-on drumsticks for maximum flavor, though skinless works if you are strictly watching calories.
The Enchilada Base
- Red Enchilada Sauce (15 oz): You can use a high-quality store-bought brand (look for ones with guajillo or ancho chilies listed first) or a quick homemade version using chili powder, tomato paste, and chicken stock.
- Liquid Smoke (Optional): Just 1/4 teaspoon adds that “slow-roasted over a fire” taste.
The Dry Rub (The Flavor Foundation)
Before the sauce goes on, we need a dry rub to season the meat and help the sauce “stick.”
- 1 tsp Smoked Paprika: For color and depth.
- 1 tsp Garlic Powder: Essential for that savory backbone.
- 1 tsp Cumin: The signature scent of Mexican-inspired cuisine.
- 1/2 tsp Onion Powder: For sweetness.
- 1/2 tsp Salt and 1/4 tsp Black Pepper.
The “Fresh” Elements (For Serving/Prepping)
- Fresh Cilantro: To brighten the dish.
- Lime Wedges: The acid cuts through the richness of the dark meat.
- Pickled Red Onions: Adds crunch and acidity.
Step-by-Step Instructions for Success
Step 1: Prep and Preheat
Preheat your oven to 425°F (220°C). Line a large rimmed baking sheet with aluminum foil or parchment paper. If you have a wire rack that fits inside the baking sheet, use it. Elevating the chicken allows hot air to circulate under the meat, ensuring it doesn’t get “soggy” in its own juices.
Step 2: The Score and Rub
Pat the chicken drumsticks dry with paper towels. Do not skip this step. Moisture on the surface creates steam; dry skin creates a sear. Use a sharp knife to make two shallow diagonal slits across the thickest part of each drumstick. In a small bowl, mix your dry rub (paprika, garlic powder, cumin, onion powder, salt, pepper). Toss the drumsticks in a large bowl with a drizzle of olive oil, then sprinkle the dry rub over them, ensuring they are evenly coated.
Step 3: The Initial Blast
Place the drumsticks on the baking sheet. Slide them into the oven for 15 minutes. This initial high-heat blast renders the fat and begins the browning process.
Step 4: The Sauce Glaze
While the chicken is in the oven, pour your enchilada sauce into a bowl. After the 15 minutes are up, remove the chicken. Use a brush or a spoon to generously coat each drumstick with the sauce. Return the chicken to the oven for another 10 to 12 minutes.
Step 5: The Finishing Touch
For the final 2-3 minutes, turn your oven to Broil. Keep a close eye on it! This will caramelize the sugars in the enchilada sauce, creating a sticky, finger-licking glaze that adheres to the meat.
Step 6: Internal Temperature Check
The USDA recommends chicken be cooked to 165°F (74°C). However, for drumsticks, taking them to 175°F (80°C) actually results in a better texture, as the extra heat further breaks down the connective tissue.
Building the Perfect Meal Prep Bowl
A meal prep is only as good as its components. To turn these drumsticks into a balanced 30-minute meal prep, you need the right “supporting cast.”
Option 1: The Classic Fiesta Bowl
- Base: Cilantro Lime Rice (use 90-second microwave rice to save time).
- Fiber: Black beans (rinsed and drained) and roasted corn.
- Topping: The Enchilada Drumsticks.
- Garnish: Fresh cilantro and a lime wedge.
Option 2: The Low-Carb / Keto Power Box
- Base: Sautéed cauliflower rice with taco seasoning.
- Veggie: Roasted bell peppers and onions (roast them on the same tray as the chicken!).
- Topping: The Enchilada Drumsticks.
- Fat Source: A side of sliced avocado (add fresh on the day of eating).
Option 3: The “Green” Lean Prep
- Base: A bed of shredded kale or cabbage (it holds up better than lettuce in the fridge).
- Veggie: Steamed broccoli tossed in a little cumin and lime.
- Topping: The Enchilada Drumsticks.
Storage and Reheating: The Science of Keeping it Fresh
One of the main reasons meal preps fail is poor storage. Follow these rules to ensure your Enchilada Chicken remains delicious for up to 4 days.
Cooling is Key
Never put steaming hot chicken into a sealed plastic container. The steam will condense into water, making your chicken skin rubbery and your rice mushy. Let the drumsticks rest at room temperature for about 10-15 minutes before sealing the lids.
Container Choice
Glass containers (like Pyrex) are superior for this recipe. Glass doesn’t absorb the strong smells of cumin and chili, and it allows for more even reheating in the microwave. Furthermore, you can pop a glass container into the oven or air fryer if you prefer to reheat your meal that way.
The Reheating Trick
When you’re ready to eat, sprinkle a few drops of water over your rice (if included) and cover the container loosely with a damp paper towel. Microwave on medium power rather than high. This prevents the outside of the chicken from becoming “leathery” before the bone is heated through.
Nutritional Breakdown: Why This Works for Your Body
The 30-Minute Enchilada Chicken Drumsticks aren’t just tasty; they are nutritionally dense.
- Protein: Chicken drumsticks provide roughly 20 grams of protein per 100g of meat. Protein is essential for muscle repair and keeping you satiated throughout the work afternoon.
- Collagen: Dark meat and joints are rich in collagen, which supports skin elasticity and joint health.
- Capsaicin: The chili peppers in the enchilada sauce contain capsaicin, which has been shown to boost metabolism and reduce inflammation.
- Micronutrients: By adding lime (Vitamin C), cilantro (Antioxidants), and beans (Iron/Fiber), you create a micronutrient-complete meal.
Pro-Tips for Customizing Your Prep
Make it Spicy
If you like heat, add a chopped chipotle pepper in adobo sauce to your store-bought enchilada sauce. The smoky heat pairs perfectly with the dark meat of the drumsticks.
Make it “Cheesy”
In the last 2 minutes of baking (during the broil phase), sprinkle a tablespoon of Monterey Jack or Cotija cheese over each drumstick. It will melt into the sauce, creating an “Enchilada Suizas” style flavor profile.
The Air Fryer Alternative
If you are cooking for one or two people, you can use an air fryer.
- Air fry the seasoned drumsticks at 400°F for 10 minutes.
- Flip, brush with sauce, and air fry for another 8-10 minutes. The air fryer is exceptionally good at rendering the skin to a “fried” consistency without the extra oil.
Troubleshooting Common Issues
“My chicken skin is soggy.”
This usually happens because the chicken wasn’t dried properly before seasoning, or the oven wasn’t hot enough. Make sure your oven is fully preheated to 425°F and that you use a wire rack if possible.
“The sauce is burning.”
Enchilada sauce contains sugars (from the tomatoes and peppers). If you put the sauce on at the very beginning of the 30-minute cook time, it will burn. Always wait until the halfway mark to apply the sauce.
“The meat is tough.”
Chicken drumsticks are rarely “tough” unless they are undercooked. Unlike breasts, which get tough when overcooked, drumsticks have a lot of connective tissue that needs heat to melt. If it’s tough, it likely hasn’t reached that 175°F sweet spot.
Frequently Asked Questions (FAQ)
Can I use chicken thighs instead? Absolutely. Bone-in, skin-on thighs work perfectly with this exact timing. If using boneless thighs, reduce the cooking time by about 5-8 minutes.
How long does the sauce stay fresh in the fridge? If you have leftover enchilada sauce, it will stay fresh in an airtight container for up to 7 days. You can also freeze it in an ice cube tray for future “mini-preps.”
Is this recipe gluten-free? Most traditional enchilada sauces are thickened with a “roux” (flour and oil). If you are gluten-sensitive, ensure you purchase a certified gluten-free sauce or make your own using cornstarch as a thickener.
Can I freeze these meal prep bowls? Yes. These drumsticks freeze beautifully. To freeze, place the cooked and cooled chicken and sides in a freezer-safe container. They will last for up to 3 months. To eat, thaw in the fridge overnight before reheating.
The Grocery List Summary
Before you head to the store, here is everything you need to make 4-5 days of 30-Minute Enchilada Chicken Drumstick meals:
- Meat: 1 large pack of Chicken Drumsticks (10-12 count).
- Produce: Fresh cilantro, 3-4 Limes, 1 Red onion, 1 bag of coleslaw mix (for a quick side salad).
- Aisle 1 (Pantry): Red Enchilada Sauce, Olive Oil, Black Beans, Rice (or Cauliflower Rice).
- Spice Rack: Smoked Paprika, Garlic Powder, Cumin, Onion Powder, Salt, Black Pepper.
Final Thoughts on the 30-Minute Routine
Efficiency in the kitchen isn’t about rushing; it’s about working smart. By choosing a forgiving cut of meat like the drumstick and utilizing high-heat cooking methods, you can produce a week’s worth of lunches that you actually look forward to eating.
The 30-Minute Enchilada Chicken Drumstick meal prep is more than just a recipe—it’s a strategy for reclaimining your time without sacrificing your health or your taste buds. Whether you are a seasoned meal prepper or a beginner looking to save money, this dish is a foolproof addition to your culinary rotation.
Now, grab your sheet pan, crank up the oven, and transform your weekly routine one drumstick at a time.